In the dynamic world of online gaming, a VPN is your secret weapon to enhance security, privacy, and access on your Xbox. Whether you’re aiming for a secure connection or overcoming limitations setting up a VPN on your Xbox can be a game-changer.
In this comprehensive guide, we’ll walk you through the step-by-step process of configuring and utilizing a VPN on your Xbox. From understanding the benefits of a VPN to navigating the setup intricacies, we’ve got you covered. Say goodbye to gaming limitations and hello to a world of boundless possibilities.
Why does “Not available in your region” appear on Xbox?
Ever been excited about a new game or app, only to be met with the frustrating message, “Not available in your region”? It’s a common headache for gamers, leaving you wondering why the virtual gates seem to be closed in your corner of the world.
One of the primary reasons for regional limitations lies in the intricate dance of licensing agreements. Game developers and distributors often strike deals with different entities for various regions, each with its own set of terms and conditions. These agreements are designed to protect intellectual property and ensure fair compensation for creators, but they inadvertently lead to the uneven availability of content across the globe.
It’s a common roadblock that can leave any gamer feeling disheartened. But fear not, as we explore in the following sections how a VPN can be your ultimate solution.
How do I set up a VPN on my Xbox?
While regional limitations can be a roadblock, they’re not an insurmountable one. Enter the Virtual Private Network – a powerful tool that allows you to transcend geographical barriers. By masking your actual location and providing a virtual presence in a different region, a VPN becomes the pass to a world where content limitations are a thing of the past.
Unfortunately, it is not possible to configure and install VPN on the console series Xbox. Вut do not be upset, because below you will learn 4 reliable methods for changing the virtual position on your console with the help of a VPN.
Method 1 – Share your computer’s VPN connection with your Xbox
One of the most effective ways to change your Xbox location is to share a VPN connection from your Windows computer. This will not only help you avoid the “Not available in your region” error when using your console, but it will also add an extra layer of privacy and security to your online activities. This section will provide detailed an instruction on how to do this, and for best results, we recommend using ZoogVPN, a leading VPN service known for its speed, reliability, and robust security features.
Before you start setting up, make sure you have an active ZoogVPN account, if you don’t already have one, you can register one via this link.
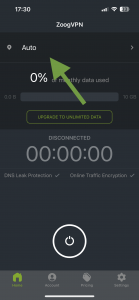
Next, download the official ZооgVPN application to your computer. After downloading and installing, open the application and connect to the server you need, which will help you avoid the problem of accessing the service or game you are interested in. You can select the server, for this click on “Change location” at the bottom of the screen as indicated in the screenshot, and then just click on the round button in the center of the main screen of the application to connect.

When the VPN is successfully configured and connected on your device, then you need to connect your Xbox directly to your computer’s network adapter via an Ethernet cable.
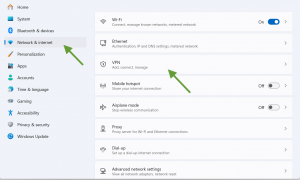
After that, you need to find “Settings” on your computer and open it. In the window that opens, go to the “Network & Internet” section and then click on the “VPN” button.
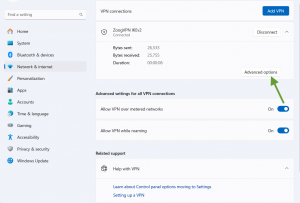
Select the actual VPN network you are currently connected to and go to “Advanced options”.
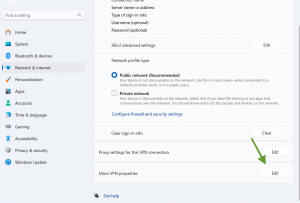
When the next window opens, scroll down to find the string “More VPN properties” and click on the “Edit” button.
Next, in the top pane, go to the “Sharing” tab and mark the “Allow other network users to use this computer’s connection to access the Internet” checkbox. In the box next to it, click on “Select a private network connection” and select your Xbox One’s Ethernet connection from the drop-down list. Click “OK” to save the setting.
Next, you’ll need to configure your Xbox One’s network settings.
- On your Xbox One, go to “Settings” and select “Network.”
- Choose “Set up a wireless network” or “Wired network,” depending on your connection type.
- Follow the on-screen instructions to connect to your shared ZoogVPN-enabled connection.
Once the setup is complete, test your connection on the Xbox One to ensure everything is working as expected. You should now experience the benefits of a secure and high-speed ZoogVPN connection on your gaming console.
Method 2 – Set up a VPN on your router and connect to it at the console
Before diving into the setup process, confirm that your router supports VPN configurations. ZoogVPN is compatible with a wide range of routers, but it’s always wise to check your router’s specifications.
In the beginning, you need to register an account with ZoogVPN if you don’t already have one. Once you have successfully registered and activated your account, you can choose the plan option that suits you.
When you have completely finished setting up your account, the next step is to set up a VPN on your router. You can set up a VPN on your router using one of the instructions.
Once ZoogVPN has been successfully configured on your router and your network has changed its IP address, all you need to do is connect to that network from your Xbox and your location change will be completed.
Method 3 – Spread the internet with a connected VPN from your phone
In this section, we’ll guide you through the process of seamlessly connecting your VPN from your smartphone to your Xbox, allowing you to enjoy a secure and unrestricted internet experience on your console.
The first step is to make sure you have an account with ZoogVPN. To get a reliable and stable VPN connection, it is recommended to use this particular service. If you don’t have an account yet, register it using this link.
Next, you need to install the official app on your phone, whether you have Android or iOS, ZoogVPN has apps for all devices.
After successful installation, open the VPN application and select the server you need, as shown in the screenshot below. Then connect to the server by clicking the button at the bottom of the main screen.
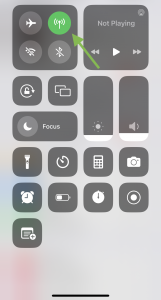
Next, you need to enable a hotspot on your phone, on the example of an iOS device we will show you how to do it.
1. Make sure you have enabled mobile internet on your device.
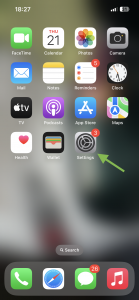
2. Find “Settings” in your menu, with the gear icon, and click on it.
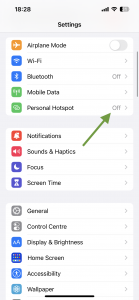
3. Next, in Settings, find the “Personal Hotspot” section and click on it.
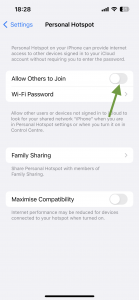
4. You will see a window with the configuration of your hotspot, in the line “Allow others to join” move the slider to the active position and allow access to connect to your device via Wi-Fi and Bluetooth. Now you have successfully set up a hotspot on your phone.
When your phone is fully set up, connected to the VPN, and giving out the network, all that’s left is to connect to that network on your Xbox, and use the password that’s listed in the hotspot settings to do so.
Additional Method 4 – Change the DNS servers on your Xbox
One often overlooked but effective way to optimize your gaming experience and change your location is by customizing your DNS servers. In this section, we’ll explore the benefits of changing DNS servers on your Xbox and guide you through the straightforward process to unlock a free more reliable connection for your gaming adventures.
Step-by-Step Guide: Changing DNS servers on your Xbox One
1. Navigate to Network Settings:
On your Xbox One, press the Xbox button on your controller to open the guide. Navigate to “Settings” and select “All Settings”.
2. Select Network:
Under “All Settings”, choose “Network”. Select the network connection you’re currently using, whether wired or wireless.
3. Advanced Settings:
Once you’ve selected your connection, choose “Advanced settings”.
4. DNS Settings:
Locate and select “DNS settings”. Change the DNS settings from “Automatic” to “Manual.”
5. Enter DNS Server Addresses:
Input the primary and secondary DNS server addresses. I recommend that you use only reliable and trusted DNS servers. For example, you might use Google’s DNS servers: Primary DNS – 8.8.8.8, Secondary DNS – 8.8.4.4.
6. Save Changes:
After entering the DNS addresses, save your changes and exit the settings menu.
You’ve successfully changed the DNS servers on your Xbox, paving the way for a more responsive and efficient gaming experience. Remember that experimenting with different DNS servers may be necessary to find the optimal configuration for your specific location and internet service provider.
Also, it is important to realize that this is a guide to changing the DNS on the Xbox One, on other consoles series Xbox instructions for changing the DNS may differ.
Now, armed with the knowledge to set up and use a VPN on your Xbox and equipped with the unparalleled service of ZoogVPN, it’s time to take the leap. Elevate your gaming experience to new heights, explore the uncharted territories of global gaming content, that were previously unavailable to you, and game with the confidence that your digital realm is secure.
Ready to unleash the full potential of your Xbox gaming experience? Dive into the world of ZoogVPN and experience gaming without boundaries.
Don’t forget to connect with us on Facebook and Twitter. We strongly encourage Free Plan users to show their support on social media. Thank you.


