Enter the world of Virtual Private Networks, a game-changing solution that not only enhances your online security but also elevates your gaming experience to unprecedented levels. If you’re a PlayStation enthusiast seeking to break free from geographical constraints, protect your digital haven, and unlock a universe of gaming possibilities, you’re in the right place.
In this comprehensive guide, we’ll unravel the mysteries of setting up and utilizing a VPN on your PlayStation console. From the basics of what a VPN is and why you need one for gaming, to a detailed walkthrough of the installation process, we’ve got you covered. Whether you’re a casual player looking to explore new gaming realms or a seasoned competitor aiming for the top spot, understanding how to harness the power of a VPN is a crucial skill in today’s interconnected gaming landscape.
Let’s dive into the intricate details of establishing a VPN connection on your PlayStation and discover the multitude of advantages that come with it.
How to install a VPN on PS4 and PS5?
When you encounter problems with limited access in your region to some services or just want to protect yourself on the Internet, the best solution to these problems will be to install a VPN on your console. For this you need to choose a reliable VPN service, we recommend you choose ZoogVPN in this case, as it is famous for its reliability, high speed, and ease of use.
Once you have chosen a VPN service, you will only need to configure it on your console, but unfortunately, no VPN service provides official applications on PlayStations. But do not be upset, as below will describe in detail several methods of how to install a VPN on your console and also one additional method to change your virtual location.
Setting up a VPN for PlayStation 4 and 5 using Windows PC
Unlocking the full potential of your PlayStation 4 and 5 involves more than just mastering in-game strategies; it’s about extending your gaming experience beyond geographical confines and fortifying your online security. In this section, we’ll guide you through the process of setting up a VPN for your PlayStation console using your Windows PC as the bridge to a world of unrestricted gaming.
Before starting the customization process, you need to register an account, if you already have one, you can proceed to the next step. After registering an account, you can choose a premium plan to get the best experience when using ZoogVPN.
Download a VPN application that is compatible with your Windows PC. Follow the installation instructions to successfully complete this step. Once the application is successfully installed and running on your computer, you can change the server to one that specifically suits your needs. This can be done by following the arrow in the screenshot below. Next, simply connect to the VPN by clicking on the round button in the center of the screen.

Once you have successfully connected to the VPN and changed the virtual location on your computer, connect the PlayStation with an Internet cable to your PC.
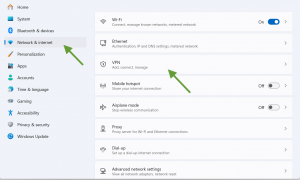
The next step is to allow access to your computer’s connection, to do this navigate to your PC’s settings, and in the “Network & Internet” section go to “VPN”.
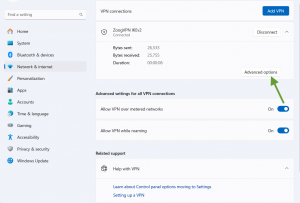
Select the VPN network you are connected to and click on the “Advanced options” button.
In the window that opens, scroll to the bottom and select “Edit” under “More VPN properties”.
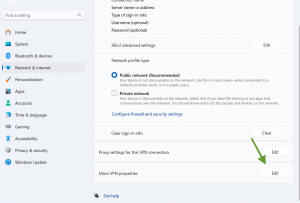
Then go to the “Sharing” tab in the top bar and select the checkbox labeled “Allow other network users to use this computer’s connection to access the Internet”. Next, click on “Select a private network connection” and from the drop-down list, select the connection of your internet cable from PlayStations to your computer. Just click “OK” to save the setting.
To conclude, configure your PlayStation’s network settings. On your PlayStation console, go to Settings, then to Network, and then to Internet Connection Setup. Select “Use LAN cable” and select “Easy” to allow automatic setup. Confirm the connection and return to the “Network” menu on your PlayStation console and select “Verify Internet Connection”. Make sure the connection is successful and the IP address matches the one ZoogVPN has given you.
Now the VPN on your Playstation is successfully set up and you don’t have to worry about regional limitations.
How to set up a VPN on PS4 and PS5 using a router?
A great option for using VPN on Playstations is also to set it up using a router, but before setting it up, make sure that your router supports VPN setup.
After that, you need to register an account in ZoogVPN, for this use the link. Also, you can look for a premium plan for your account,which will be perfect for your purposes.
Now that your account is ready to be used to set up a VPN, find the instructions for your router and start setting up the VPN. Once you have successfully set up and changed your virtual location on your router, you will need to connect your Playstation to a network with a configured VPN.
To do this, use the PlayStation controller to navigate. Press the “X” button to go to the “Settings” icon. Next, find and select the “Network” option. From the “Network” menu, select “Internet Connection Setup” and click on the “Wireless Connection.” Choose a network with a configured VPN and connect to it.
Set up a VPN on PlayStation using a hotspot on your phone
If you’re a PlayStation enthusiast looking to enhance your gaming experience with the added benefits of a Virtual Private Network, you’re in the right place. In this section, we’ll walk you through the steps of setting up a VPN on your PlayStation using your phone’s hotspot, ensuring a seamless and secure gaming session.
First, sign up for ZoogVPN to get access to the most reliable VPN service. You can choose a premium plan for your new account by clicking here.
Install the official VPN app on your phone. ZoogVPN provides apps for various phone operating systems such as Android, iOS, and even Windows Phone.
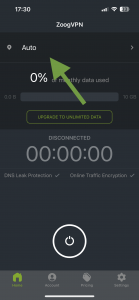
After installing the app, open it. You can select the server you need by clicking on Auto in the top bar of the app and choosing the server you need from the drop-down list. To connect, click on the round button at the bottom of the screen.
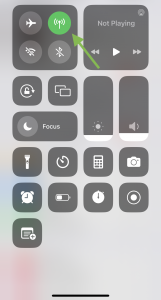
Next step, you need to set up a hotspot on your phone, below are the instruction with the device on the iOS operating system.
1. Firstly, check that your mobile internet is turned on.
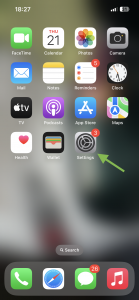
2. Find “Settings” and navigate to it, it looks like a gear icon.
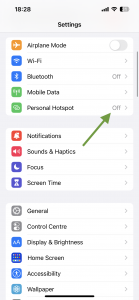
3. In the opened settings, click on the “Personal hotspot” field.
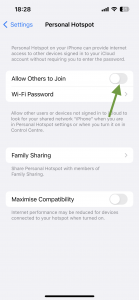
4. Next, move the slider to the active position in the “Allow others to join” field.
At this stage you have successfully shared the network with VPN enabled, the only thing left to do is to connect to it on your console.
To do this, use the PlayStation controller to navigate. Press the “X” button to go to the “Settings” icon. Next, find and select the “Network” option. From the “Network” menu, select “Internet Connection Setup” and click on the “Wireless Connection.” Choose a network with a configured VPN and connect to it.
Your console now has a valid Internet connection with a modified virtual location. Enjoy free access to all your Playstation games.
Changing the DNS server on your PS4 and PS5
In addition to VPN services, you can also change your virtual location by changing the DNS servers. To do this, just follow the instructions below:
1. Accessing Network Settings.
Begin by powering up your PS4 or PS5 console and navigating to the main menu. From there, go to “Settings” and choose the “Network” option.
2. Selecting Internet Connection Settings.
Within the “Network” menu, locate and select “Set Up Internet Connection.”
3. Customizing Connection Settings.
Now, choose the connection method as “Custom” to access advanced settings. After that, select your preferred Wi-Fi network connection.
4. Configuring IP Address Settings.
When prompted to choose the IP address settings, select “Automatic”. For DHCP Host Name, choose “Do Not Specify.”
5. Setting DNS Settings to Manual.
At the DNS settings step, choose “Manual” instead of “Automatic.” This allows you to input custom DNS server addresses.
6. Entering Primary and Secondary DNS Addresses.
Now, input the DNS server addresses you want to use. Google’s public DNS servers (8.8.8.8 for the primary and 8.8.4.4 for the secondary) are popular and reliable choices. Alternatively, you can use other reputable DNS services like OpenDNS or Cloudflare.
7. Completing the Setup.
After entering the DNS addresses, proceed through the rest of the setup process. Confirm your settings and save changes. Your console will now use the custom DNS servers you’ve specified.
As we’ve explored the steps to set up a VPN on your PlayStation and delved into the game-changing world of DNS customization, you’ve gained the tools to transcend the ordinary. ZoogVPN not only ensures your privacy and security but also unleashes the true potential of your gaming console.
Order your ZoogVPN subscription now and enjoy your PlayStations experience without any limits.
Don’t forget to connect with us on Facebook and Twitter. We strongly encourage Free Plan users to show their support on social media. Thank you.


