Here is how to add a ZoogVPN Extension in Chrome.
A VPN Google Chrome extension is a browser extension that allows users to connect to a virtual private network (VPN) directly from their Google Chrome browser. This extension encrypts the user’s internet traffic and reroutes it through a private server, masking their IP address and location. This provides users with enhanced online privacy and security, as well as the ability to access unavailable content. Although Google Chrome VPN is not as secure as dedicated VPN apps it’s still better than nothing when it comes to your privacy and Internet freedom.
The following guide will take you through the steps required to install the ZoogVPN extension in your Chrome browser.
Step 1 – Add the ZoogVPN extension to your Chrome browser
- follow the link, where you can find the ZoogVPN extension to Chrome browser: ZoogVPN – Free VPN for Chrome & Proxy
- click on the ‘Add to Chrome’ button:

- click on the ‘Add extension’ button:

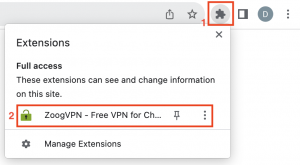
- in the upper right corner of the browser, click on ‘Extensions’ and select ZoogVPN – Free VPN for Chrome & Proxy from the list:
Step 2 – Connect your browser to the VPN
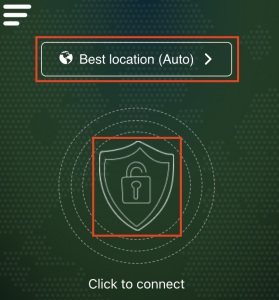
To connect to the VPN, just click on the lock icon in the middle of the extension window.
- You can connect to an automatically chosen server:
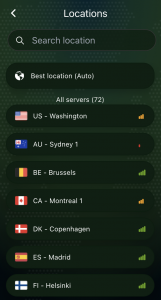
- Or you can choose a server for connection from the list by yourself:
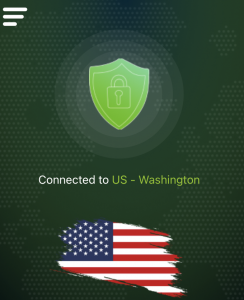
Congratulations! You have successfully connected your browser to the VPN and the extension window should look like this now:
You are almost done, but this is still not the end. Only 10 GB of traffic per month and three free servers are available for connection without registration.
So, if you want to use our VPN without any limits – you can either create a new account and purchase a premium subscription, or you can log in to an existing account with an activated premium plan. Let’s continue with Step 3.
Step 3 – Login to your ZoogVPN account in the extension window
If you still don’t have a ZoogVPN account – you can create a new account, find available plans for a premium subscription, and make a purchase of the one that suits you best by the following link: ZoogVPN Checkout.
Let’s log in to your ZoogVPN account in the extension window now.
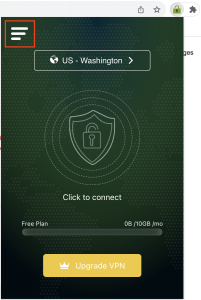
- In the upper left corner of the extension window, click on the three horizontal lines (as in the screenshot):
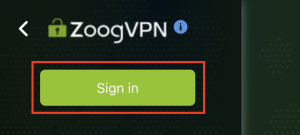
- Click on the ‘Sign in’ button:
- Sign in using credentials (login, password) from your ZoogVPN account.

That’s all! You’ve successfully logged in to your account and all servers are available for connection in the extension now.
It is important to note that the VPN extension works exclusively in the browser while other traffic stays unaffected. If you want complete privacy, we recommend installing our app on all your devices to enjoy a fast, secure, and unrestricted internet experience.
Start using ZoogVPN today to ensure a safe internet experience.
Don’t forget to connect with us on Facebook and Twitter. We strongly encourage Free Plan users to show their support on social media. Thank you.


