Disabling a VPN on Windows can be done in several ways, depending on how it was set up – through a VPN app or manually. Below are different methods and instructions for both Windows 10 and 11.
1. Disabling a VPN via the App
If you installed a VPN using an official app, you can usually disable it directly from there.
Steps are as follows:
- Open the VPN app. Look for the app on your desktop, Start menu, or in the system tray.
- Disconnect. Next, you’ll see a prominent “Disconnect” button on the main screen. Simply click it to stop the VPN.
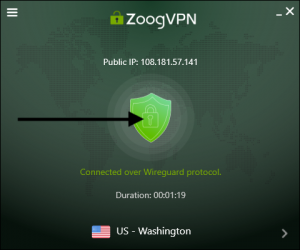
- Quit the app. For full deactivation, you can right-click the app icon in the system tray (bottom-right corner of your screen) and select “Close” or “Exit.”
Difference between Windows 10 and 11
In Windows 10 and 11, the process is largely the same. The only noticeable difference might be in how the system tray appears or how apps are managed in the taskbar. Windows 11 has a more centralized and modern design for icons, but app interaction remains similar.
2. Disabling a Manually Configured VPN
If you manually configured a VPN (e.g., using Windows’ built-in VPN settings), you can disable it through the system settings.
Steps for Windows 10:
- Open Settings. Click the Start menu and go to Settings > Network & Internet.
- Select VPN. In the left-hand menu, select VPN.
- Disconnect. Choose the VPN connection you want to disable and click Disconnect.

Steps for Windows 11:
- Open Settings. Press Windows + I to open Settings, or go to the Start menu and select Settings.
- Navigate to Network & Internet: Click Network & Internet in the side panel, then click VPN.
- Disconnect the VPN. Find the manually configured VPN connection and select Disconnect.
3. Disabling a VPN from the System Tray (Quick Method)
You can also disable your VPN directly from the system tray in both Windows versions.
Follow these steps:
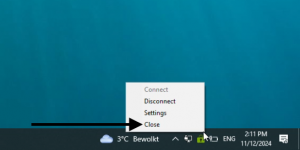
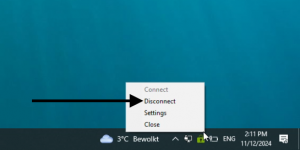
- System tray. Click the small arrow in the bottom-right corner of your screen to reveal hidden icons.
- Right-click the VPN icon. If your VPN is running, it should have an icon here.
- Disconnect or quit. Right-click the icon and choose “Disconnect” or “Quit” to stop the VPN.
Difference between Windows 10 and 11
In Windows 11, the icons in the system tray are slightly more compact, but the steps remain largely the same.
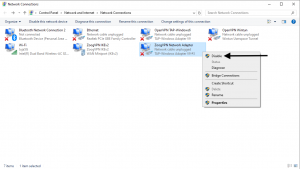
4. Disabling a VPN from Windows Settings (for Both Versions)
If you are unsure of the setup or want to disable the VPN entirely, you can also use this method via the general network settings.
For Windows 10:
- Open Settings: Start menu > Settings > Network & Internet > Status.
- Disable the VPN Adapter: Scroll down and select Change adapter options. Right-click the VPN connection and select Disable.
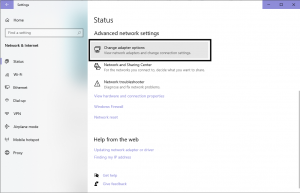
For Windows 11:
- Settings menu. Start menu > Settings > Network & Internet > Advanced network settings.
- Disable the VPN adapter. Under Network adapters, locate the VPN, right-click, and choose Disable.
Depending on how your VPN is configured, you can easily disable it through the app, manually, or via the system tray. Both Windows 10 and 11 allow similar methods for VPN management, but Windows 11’s design is slightly more modern and streamlined.


