Before we start your device must be connected to the Internet.
To change the DNS settings, follow the instructions below:
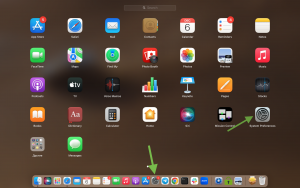
Step 1 – Opening the settings.
Initially, you need to open your device settings, you can open them through the bottom bar with application icons or by pressing F4 to open the menu with all applications. Find the settings icon and tap on it.
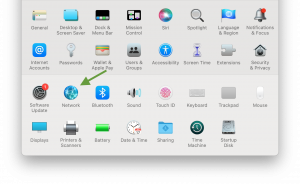
Step 2 – Open the network settings.
In the settings that open, click on the “Network” icon.
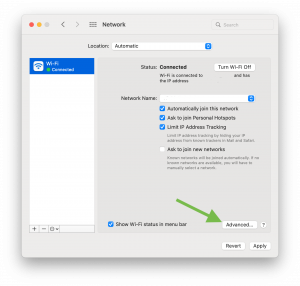
Step 3 – Network Selection.
The next step is to select the network for which you want to change DNS settings if you have more than one. Once you have already selected a network, you need to click on “Advanced” to open the advanced settings for that network.
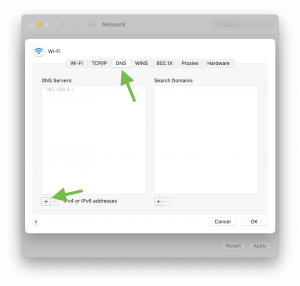
Step 4 – Path to change DNS settings.
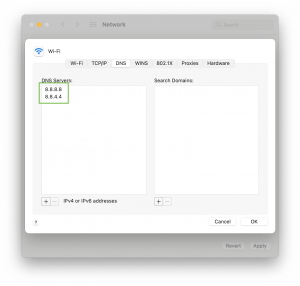
Instead of Wi-Fi, go to the DNS box in the top row in the window that opens and click “+” as indicated in the screenshot.
Step 5 – Entering and saving the DNS settings.
Next, you will see the cursor in the DNS Servers box and you will be able to enter different addresses. You can use Google Public DNS, 8.8.8.8.8 and 8.8.4.4, or if you don’t like these addresses, you can also enter 208.67.222.222 and 208.67.220.220 from OpenDNS. Press OK to save these settings. To apply them, click Apply in the lower right corner of the window.
Also, as a cybersecurity company, we encourage you to use only reliable and secure DNS servers, for example, the ones we’ve listed. Using unsecured servers can be vulnerable and expose you to danger.
Now you can be congratulated, after following all these steps you have successfully changed the DNS settings on your macOS. Also, besides changing DNS servers, you can use our ZoogVPN service to connect to VPN servers. Using ZoogVPN service is safer than DNS servers because it provides a more secure and reliable connection and you eliminate the possibility of DNS leaks.
Start using ZoogVPN today to protect your network connection and avoid DNS leaks!
Don’t forget to connect with us on Facebook and Twitter. We strongly encourage Free Plan users to show their support on social media. Thank you.
If you still have any questions or problems during this setup, please contact our support team for fast and qualified assistance.


