Here’s a guide on how to set up a proxy in your Linux device through the Settings menu. Start the process by going to the Settings menu on the system of your linux device. In case your operating system is Ubuntu, please proceed to opening the “Networks” section and selecting “Network Proxy.” Next, follow the steps below:
Step 1. Go to the Ubuntu launcher, placed on the left side of the screen
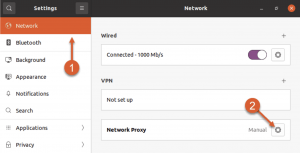
Follow “Show applications” to search for programs. Type “Network” in the search bar and select “Settings > Network” to open the network settings.
Step 2. Within the dialog box that appears upon choosing “Network,” you’ll be offered with the three options:
- Wired;
- VPN;
- Network Proxy;
Tap on “Network Proxy” to follow the process.
Step 3. There will be the three options when accessing the “Network Proxy” dialogue box:
- Automatic;
- Manual;
- Disabled;
The “Disabled” option will be selected by default. To set up a proxy server, choose “Manual.” This action will display additional text boxes that enable you to define the proxy settings for HTTP, HTTPS, FTP, and SOCKS protocols.
New address: ZoogVPN Address
Port: ZoogVPN Port
– Change proxy_server_address and proxy_port with the relevant information that your proxy service provides.
ZoogVPN currently supports SOCKS5 proxy, which is faster, more reliable and a highly secure option.
You’re now all set. The changes will be automatically saved upon closing the “Network Proxy” window, activating the system-wide proxy.
Let’s now move on with another option for configuring a proxy in the Ubuntu terminal. We’ll follow the method of setting up temporary proxy settings using proxy environment variables.
Instructions to Set Up a Proxy on Your Ubuntu via Network Manager
- Go to the settings on your Linux system
Access the settings icon on your device.
- Follow Proxy settings
When accessing the settings window, choose the Network section and then under Network Proxy press on the gear to access the proxy settings.
- Setup proxy
Open the Network Proxy setup window, opt for “Manual” as the screenshot demonstrates and you will be delivered with the place to input in the data for the proxy connection.
For the successful connection, type in the server address you require to connect to in the Socks Host field. To showcase this, we specified the Belgium server – be1.zoogvpn.com. Feel free to make use of the full list of available servers for connecting to the Socks5 proxy.
In addition, continue and specify the port to connect to. There are the options to connect to the proxy with 1080, 5060, or 41080 ports.
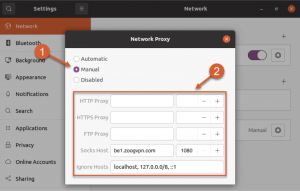
When you’re done, just close the settings window and this proxy configuration will automatically take effect and your virtual location will be modified.
Setup Instruction for Setting Up Proxy on Ubuntu in Terminal
Follow this guide in case you do not have access to the graphical interface of your device. Besides, hen setting up the proxy through the terminal, you have the option to configure it for either all terminal sessions or solely for the current one, offering greater flexibility in your configuration.
Follow these steps to establish a proxy for the ongoing session:
- Access the terminal
You can open the terminal with the command “CTRL + ALT + T”.
- Set up a proxy
Subsequently, you need to input the commands that will temporarily connect you to the proxy until your system is rebooted:
export socks5_proxy=login:password@server_address:1080
export no_proxy=localhost,127.0.0.1,::1
When prompted for your login and password, input the credentials from your ZoogVPN account.
Instead of server_address, you have to ensure the address of the server, which you can find in the list (link) of all available servers for connecting to the proxy.
You can also replace port 1080 with 1080, 5060, or 41080.
The no_proxy term is provided to specify to the system that local traffic should ignore the proxy.
- Check connection
Following the successful completion of the preceding steps and the configuration of the proxy connection, your IP address should have been automatically changed. To verify successful operation, execute the following command:
wget -qO- https://ip-api.com/
You can run this command using a URL if you don’t have wget installed.
To establish persistent proxies for all sessions and users, adhere to the instructions provided below:
- Open the Terminal
You can open the terminal with the command “CTRL + ALT + T”.
- Edit the /etc/environment File
Initially, to execute this configuration, you’ll need to log in with a root or administrative account. Then, proceed to modify the /etc/environment file using the command:
sudo nano /etc/environment
- Configure proxy
Once you’ve prepared the command to modify the file, it’s time to insert the proxy configuration lines into the file using the following command:
export socks5_proxy=”login:password@server_address:1080″
export no_proxy=”localhost,127.0.0.1,::1″
For the proxy configuration to take effect, save the file and log out. The proxy settings will be automatically activated the next time you log in.
Set up a proxy for APT
In some cases, creating a separate proxy configuration file for APT may be necessary to ensure successful proxy configuration, as it does not utilize system environment variables. To set this up, please refer to the instruction manual:
- Initially, you’ll need to create or update the /etc/apt file, and subsequently, you can configure the proxy settings:
sudo nano /etc/apt/apt.conf
- Input such a string to this file:
Acquire::socks5::Proxy “socks5://login:password@server_address:1080”;
To complete the configuration, save the file and quit. When you restart the computer, the configuration will be applied.
Change your virtual location and protect your internet connection with a Socks5 proxy from ZoogVPN.
Instruction to Configure a Proxy in Linux Terminal
Begin by opening the Ubuntu terminal and setting up a proxy there. There are multiple methods to use, but we’ll start by configuring temporary proxy settings using proxy environment variables.
Implement a temporary proxy for the current terminal session with the actions listed below:
- Launch a new terminal with the one of these two following steps:1) by clicking on the terminal icon 2) by using the shortcut “CTRL + ALT + T”;
- After setting up the terminal, input these commands to implement two new environment variables:
export http_proxy=”ProxyPlanUsername:Password@ProxyServerAddress:ProxyPort”
export https_proxy=”ProxyPlanUsername:Password@ProxyServerAddress:ProxyPort”
Verify that there are no spaces left between the equal signs and variables when typing in the commands. The export command is leveraged to implement new environment variables exclusively for the ongoing terminal session. You can verify the activation of these environment variables by executing the subsequent command in the terminal.
export
This command is aimed at demonstrating all active environment variables, covering http_proxy and https_proxy, within the ongoing session. The format for the string YourProxyPlanUsername:ZoogVPN data is :<YourProxyPlanPassword@:. In our instance, we presume the proxy plan username is “username” and the proxy plan password is “password”. Kindly substitute this information with the respective values.
Once these environment variables are exported, the proxy will be enabled for all subsequent commands. You can confirm the activation of the proxy by executing the following command and verifying your IP address:
wget -qO- https://ip-api.com/
In case Wget isn’t installed on your device then, you can alternatively run it using URL.
Permanently configure proxies for all terminal sessions
To eliminate the need for configuring proxy settings during each new initiated terminal session, you can establish a permanent proxy configuration that will be used with all terminal sessions by default. The process for configuring the permanent proxy differs based on the shell you’re using and incorporates modifying the shell configuration file.
- Use the command described below to navigate to the shell configuration file in the ZSH terminal and adjust it using the Vim editor:
vim ~/.zshrc
When it comes to using another text editor such as gedit or nano, you can substitute “vim” with the name of your preferred text editor in the command. Furthermore, if you’re using the Bash shell instead of ZSH, you’ll need to modify the bash shell configuration file placed at ~/.bashrc rather than ~/.zshrc
- At the conclusion of the configuration file, append the subsequent lines to define the “http_proxy” and “https_proxy” environment variables:
export http_proxy=”ProxyPlanUsername:Password@ProxyServerAddress:ProxyPort”
export https_proxy=”ProxyPlanUsername:Password@ProxyServerAddress:ProxyPort”
The procedure for configuring the “http_proxy” and “https_proxy” variables is the same as for the temporary proxy setup.
- Please reload the configuration file, implement the changes you’ve made. You can achieve this by the one of these two options: 1) launching a new terminal session 2) executing the following command in the current terminal:
source ~/.zshrc
Thus, the proxy settings will persist for the active user. The shell configuration file is loaded every time a new terminal is initiated, ensuring that the environment variables are consistently accessible, even after a system reboot.
To enable the proxy for all users, you’ll need to append the same two lines mentioned earlier to the /etc/environment file.
Guide to Set Up Proxy for APT From Terminal
You’ll be required to fulfill additional actions to set up a proxy for APT from the terminal. APT serves as the package manager utilized in Debian, Ubuntu, Linux Mint, and similar distributions. It depends on repositories or directories housing software packages that can be installed via straightforward commands. It’s needed to edit the /etc/apt/apt.conf file to set up a proxy for APT. Stick to the steps listed below to access it using the Vim editor:
vim /etc/apt/apt.conf
When you’re done, include the following lines to enable ZoogVPN Residential Proxy for APT:
Acquire::http::Proxy “http://ProxyPlanUsername:Password@ProxyServerAddress:ProxyPort”;
Acquire::https::Proxy “http://ProxyPlanUsername:Password@ProxyServerAddress:ProxyPort”;
After configuring the proxy for APT using ZoogVPN Residential Proxy, it will be leveraged automatically during the installation or update of applications or packages. Check whether the correct server address and port number are set, and replace the username and password with the respective proxy plan credentials. Neglection of this action might result in a 407 Authentication Required Error.


