Before we start an active ZoogVPN subscription is required and your device must be connected to the Internet.
How to set up PPTP on Linksys Smart Wi-Fi router
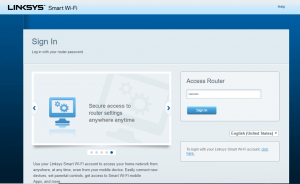
The first step is to access your Linksys router’s control panel. In the address bar of your browser, type 192.168.1.1 (or 192.168.0.1) to accomplish that. A window will pop up, asking you to enter your password. Unless you have changed your credentials, you can find the default username on the label attached to your router.

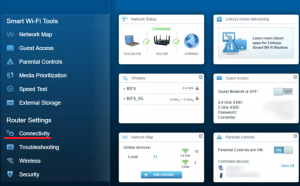
Navigate to the Router Settings and select Connectivity.

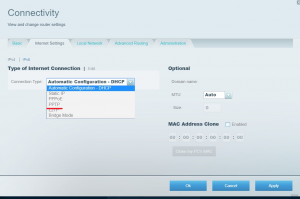
Click Internet Setup, make sure you have IPv4 selected then click Edit.

From the Connection Type drop-down menu, select PPTP.
Enter the following data now:
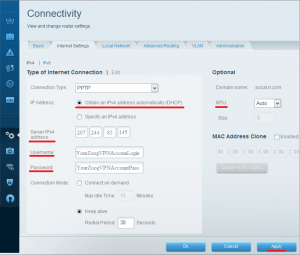
- Mark the Obtain an IP Address Automatically;
- Server Address: (You can choose the server you want to connect to by clicking here. After selecting the server, please contact our support team for the IP address in numeric format);
- Username – Use your ZoogVPN account login name;
- Password – Use your ZoogVPN account password;
- MTU: Auto;
- Click Apply. While the settings are being changed, you might have to wait.
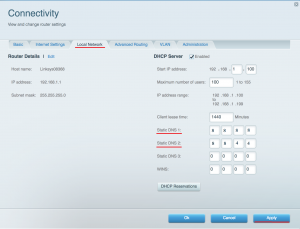
Next, select the Local Network section
Here you need to specify the following:
- Static DNS 1 – 8 8 8 8;
- Static DNS 2 – 8 8 4 4;
- Click the Apply button.
Now your Linksys smart wifi router has successfully connected to ZoogVPN.
How to set up PPTP on Linksys router
Log into the router’s control panel (http://192.168.0.1 or http://192.168.1.1)
Insert the information below:
- Select Setup;
- Next, select Basic Setup;
- From the drop-down menu under “Internet Connection Type”, choose PPTP.
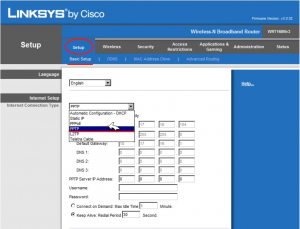
Fill in the following data:
- Put a checkmark next to “Automatically Obtain IP Address“;
- Server Address: (You can choose the server you want to connect to by clicking here. After selecting the server, please contact our support team for the IP address in numeric format);
- Username: Use your ZoogVPN account login name;
- Password: Use your ZoogVPN account password;
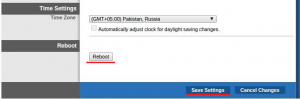
After filling in all the necessary information, click on Save Settings and then Reboot.

How to set up PPTP on Linksys E-5350 Wi-fi router
The first thing you need to do is to log into the control panel of your router. To do this, enter the following address in the search bar of your browser: http://192.168.0.1 or http://192.168.1.1 (If nothing happened, please refer to the handbook for your router to get the Default Gateway Address)
After logging in, choose WAN Setup from the drop-down list under Local Network.
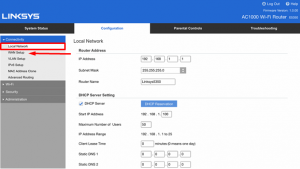
Set the Internet Connection to PPTP under the WAN Setup.
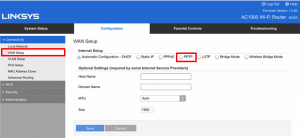
Next, you will need to fill in the following information:
- DNS 1 (Optional): 8.8.8.8;
- DNS 2 (Optional): 8.8.4.4;
- Server Address: (You can choose the server you want to connect to by clicking here. After selecting the server, please contact our support team for the IP address in numeric format);
- Username – Use your ZoogVPN account login name;
- Password – Use your ZoogVPN account password;
- Keep Alive: Always On;
- Click the Save button to activate the VPN connection.

After following these instructions, your Linksys E-5350 router will be configured to connect with ZoogVPN.
Enjoy! You have now taken control of your Internet freedom, privacy, and security.
Before we start an active ZoogVPN subscription is required and your device must be connected to the Internet.
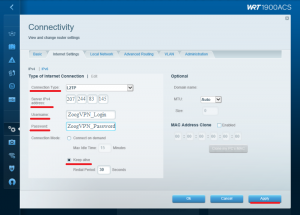
How to set up L2TP on Linksys Smart Wi-Fi router
To begin, you need to access the control panel of your Linksys router. In the address bar of your browser, type 192.168.1.1 (or 192.168.0.1) to accomplish that. A window will pop up, asking you to enter your password. Unless you have changed your credentials, the default username you can find on the label on your router.
Navigate to the Router Settings and select Connectivity.
Click Internet Setup, make sure you have IPv4 selected then click Edit.
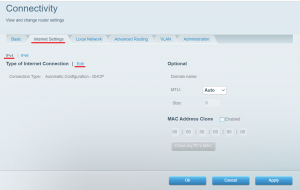
From the Connection Type drop-down menu, select L2TP.
Server IPV4 address: (You can choose the server you want to connect to by clicking here. After selecting the server, please contact our support team for the IP address in numeric format);
Username – Use your ZoogVPN account login name;
Password – Use your ZoogVPN account password;
Then click “Apply” and your router will start connecting to the ZoogVPN server. (The VPN connection takes 30–60 seconds to establish)
To verify if you have successfully connected to ZoogVPN, you can check on this website: click here.
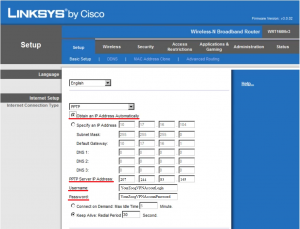
How to set up L2TP on Linksys router
To configure VPN, you must first log in to the web interface of your router. By default, you can use one of these addresses: http://192.168.0.1 or http://192.168.1.1
Insert the information below:
- Select Setup;
- Next, select Basic Setup;
- From the drop-down menu under “Internet Connection Type” choose L2TP.
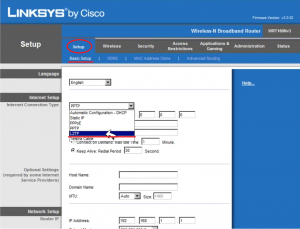
Fill in the following data:
- Server Address: (You can choose the server you want to connect to by clicking here. After selecting the server, please contact our support team for the IP address in numeric format);
- Username: Use your ZoogVPN account login name;
- Password: Use your ZoogVPN account password;
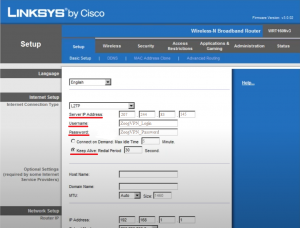
After filling in all the necessary information, click on Save Settings and then Reboot.