Here is how to set up a VPN (OpenVPN) on your CentOS Linux.
Before we start an active ZoogVPN subscription is required and your device must be connected to the Internet.
You need full administrative privileges on your computer.
Step 1 – Open the Terminal
Click on the Terminal icon to begin our setup.
Step 2 – Update Your Packages
This step is not mandatory, but we advise you to update your packages to the most up-to-date ones before installing OpenVPN, you can do this with the command:
sudo yum update
Step 3 – Switch to the Root User
Use the command to switch to the root user:
su –
To complete this step, you will need to enter the root password.
Step 4 – Installing OpenVPN
Installing the OpenVPN application on CentOS Linux can be done by specifying a command in the terminal:
yum -y install NetworkManager-openvpn NetworkManager-openvpn-gnome
Step 5 – Download OpenVPN Configuration Files and Authority Certificate
You need to download configuration files and certificate to your device from your ZoogVPN account to set up the VPN.
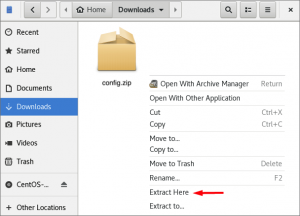
Step 6 – Unzipping Configuration Files
After successful downloading of the configuration zip file, it must be unzipped. To implement this, find the downloaded file in the downloads section, click on it, and select “Extract here” from all available actions.
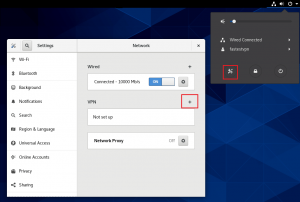
Step 7 – Network Settings
Next, we will proceed to the VPN configuration, to do this click on the network icon and then on the settings button, as shown in the screenshot. In the next window that opens, click on the “+” in the VPN section.
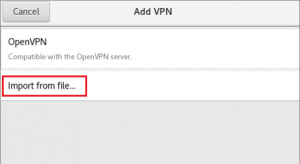
Step 8 – Importing Configuration Files
In the next step, we will import the previously downloaded configuration, to do this select Import from the file.
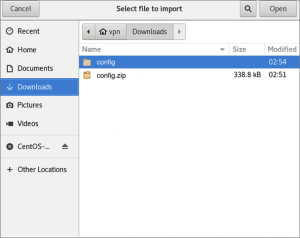
After that, find the configuration file that you have already unzipped and navigate to it. There you will see a list of servers you can connect to using the UDP or TCP protocols, select one you are interested in and click “Open” in the upper right corner.
You can see the full list of servers at the link.
Step 9 – OpenVPN Connection Setup
To make your connection to OpenVPN successful, you need to configure it correctly and to implement this, fill in all the fields carefully.
You can fill in the “Name” field as you wish, usually, it is called the server’s name to be connected to, which would be convenient to navigate in VPN connections, if you have several of them.
Gateway will be automatically filled with the address of the server you have chosen to connect to.
Next, select the “Password” type for authentication, if you haven’t already selected it. Fill in the username and password fields with the data from the account you registered in ZoogVPN.
Add the previously downloaded authority certificate to the “CA certificate”.

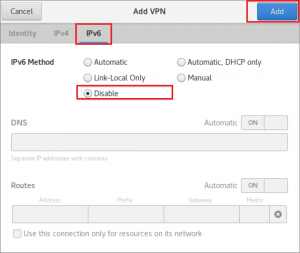
Also, navigate to the IPv6 section, select “Disable” and click “Add” to save all settings.
Step 10 – Connecting to the Configured Network
Return back to the network settings and opposite the name of your ZoogVPN connection, move the slider to the active position.
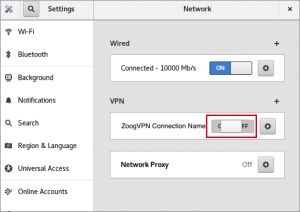
If you have configured everything correctly, the connection should be successful and in front of the configured connection will be indicated “ON”, also, there will be an icon of a successful connection to the VPN, as shown in the screenshot below.

Protect your data and keep your online activity private right now with ZoogVPN on your CentOS.
Didn’t find an answer to your question? Contact our 24/7 customer support team here.


