Before we start an active ZoogVPN subscription is required and your device must be connected to the Internet.
We highly recommend our dedicated iPhone app based on IKEv2 and OpenVPN protocols, instead of a manual setup. It takes a few seconds to install and it is more secure as we have some additional features in our apps including DNS leak protection, IP leak protection, and more!

If you still want to use VPN on iPhone manually, here you go:
Сhoose the preferred VPN protocol:
Works with iPhone running iOS 9.3+
Step 1 – Navigate to Settings
Tap on ‘Settings’ on your main screen.
Step 2 – Tap on VPN
Tap on ‘VPN’.
Step 3 – Add VPN Configuration
Tap on ‘Add VPN Configuration…’ on the ‘VPN’ screen.

Step 4 – Configure IKev2 VPN
Tap on ‘IKev2’ on the ‘Add Configuration’ screen.
Next, choose a VPN server to enter the Server Address. You can find all available server addresses in your account here. For example, server address can look like this: nl.free.zoogvpn.com
To ensure fast internet speed, it’s recommended to connect to the nearest VPN server.

Under ‘Description‘ enter Server Location as per above.
Under ‘Server‘ enter your Server Address.
Under ‘Remote ID‘ enter your Server Address.
Under ‘Username‘ and ‘Password’ enter your account credentials. Your username is basically the email address of your ZoogVPN account. Your password is the password you used when creating your ZoogVPN account.
Keep PROXY ‘Off’.
Once all information is correctly entered tap on ‘Save’ to save your IKEv2 VPN settings.
Step 5 – Turn on Zoog IKev2 VPN
Turn VPN on by sliding the ‘On’ button right.
Upon successful connection, the following screen will be displayed.

To turn off the VPN just slide the button left.
That’s it! It’s that simple! Now you know how to setup VPN on iPhone and protect your internet connection, but don’t forget that iPad has a similar installation principle so you can use this instruction for both devices.
Start using ZoogVPN today to ensure a safe internet experience.
Don’t forget to connect with us on Facebook and Twitter. We strongly encourage Free Plan users to show their support on social media. Thank you.
Didn’t find an answer to your question? Contact our 24/7 customer support team here.
Works with iPhone running iOS 9.3+
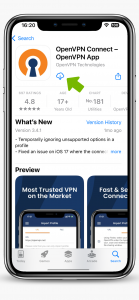
Step 1 – Download OpenVPN App
The first step is to install the OpenVPN app on your iPhone. Click here to install the app.
Step 2 – Download Config Files
Choose your desired location and tap on the Download icon to download the OpenVPN configuration file. We recommend using ‘TCP’ only when ‘UDP’ is not available or when a more secure VPN connection is required. You can find all available servers in your account here.
To ensure fast internet speed, it’s recommended to connect to the nearest VPN server.
Step 3 – Opening Files
Find the “Files” icon in your phone’s menu and open it.

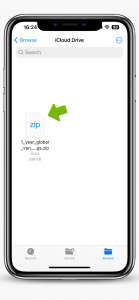
Step 4 – Unpacking the Configuration Files
In the files, find the zip archive that stores the configuration file, it will be the very first one in your installation list. Click and unzip this archive.
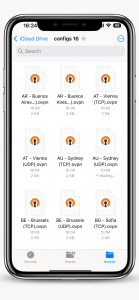
Step 5 – Opening Configuration Files
After unzipping the zip file, you will need to go to the configuration folder. There you can choose any server and protocol configuration you are interested in.
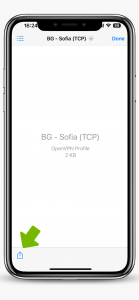
Step 6 – Start Importing Configuration Files
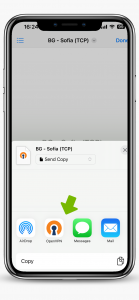
When you have selected the configuration file, click on the icon in the lower left corner as shown in the screenshot to start installing the file.
Step 7 – Finishing Importing Configuration Files
Click on the “OpenVPN” icon in the window that opens.
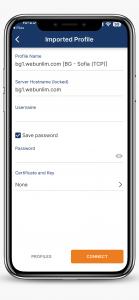
Step 8 – Customizing the OpenVPN Profile.
You will be presented with the OpenVPN application with the configuration you selected. You’ll need to enter your account credentials. Your username is basically the email address of your ZoogVPN account. Your password is the password you used when creating your ZoogVPN account. To save the settings and connect, tap “Connect”.
Next, your device settings will ask to add this configuration, don’t worry, this is a basic request, just click “Allow”.
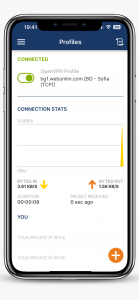
Step 9 – Server Connection.
If you have done everything correctly, you will be successfully connected, you can disconnect from the VPN by moving the slider.
That’s it! It’s that simple! Now you know how to setup VPN on iPhone and protect your internet connection, but don’t forget that iPad has a similar installation principle so you can use this instruction for both devices.
Start using ZoogVPN today to ensure a safe internet experience.
Don’t forget to connect with us on Facebook and Twitter. We strongly encourage Free Plan users to show their support on social media. Thank you.
Didn’t find an answer to your question? Contact our 24/7 customer support team here.
Works with iPhone running iOS 9.3+
Step 1 – Navigate to Settings
Tap on ‘Settings’ on your main screen.

Step 2 – Tap on VPN
Tap on ‘VPN’.

Step 3 – Add VPN Configuration
Tap on ‘Add VPN Configuration…’ on the ‘VPN’ screen.
Step 4 – Configure L2TP VPN
Tap on ‘L2TP’ on the ‘Add Configuration’ screen.
Next, choose a VPN server to enter the Server Address. You can find all available server addresses in your account by this link. For example, server address can look like this: nl.free.zoogvpn.com
To ensure fast internet speed, it’s recommended to connect to the nearest VPN server.

Under ‘Description‘ enter Server Location as per above.
Under ‘Server‘ enter your Server Address.
Under ‘Account’ and ‘Password’ enter your account credentials. Your ‘account’ is basically the email address of your ZoogVPN account. Your ‘password’ is the password you used when creating your ZoogVPN account.
Under ‘Secret enter‘: ZoogVPN
Keep RSA SecurID ‘Off’ and PROXY ‘Off’ while keeping Send All Traffic ‘On’
Once all information is correctly entered tap on ‘Done’ to save your L2TP VPN settings.
Step 5 – Turn on Zoog L2TP VPN
Turn VPN on by sliding the ‘On’ button right.
Upon successful connection, the following screen will be displayed. To turn off the VPN just slide the button left.

That’s it! It’s that simple! Now you know how to use VPN on iPhone and protect your internet connection, but don’t forget that iPad has a similar installation principle so you can use this instruction for both devices.
Start using ZoogVPN today to ensure a safe internet experience.
Don’t forget to connect with us on Facebook and Twitter. We strongly encourage Free Plan users to show their support on social media. Thank you.
Didn’t find an answer to your question? Contact our 24/7 customer support team here.
Works with iPhone running iOS 9.3+
Step 1 – Navigate to Settings
Tap on ‘Settings’ on your main screen.
Step 2 – Tap on VPN
Tap on ‘VPN’.
Step 3 – Add VPN Configuration
Tap on ‘Add VPN Configuration…’ on the ‘VPN’ screen.
Step 4 – Configure IPSec VPN
Tap on ‘IPsec’ on the ‘Add Configuration’ screen.
Next, choose a VPN server to enter the Server Address. You can find all available server addresses in your account here. For example, server address can look like this: nl.free.zoogvpn.com
To ensure fast internet speed, it’s recommended to connect to the nearest VPN server.

Under ‘Description‘ enter Server Location as per above.
Under ‘Server‘ enter your Server Address.
Under ‘Username‘ and ‘Password’ enter your account credentials. Your username is basically the email address of your ZoogVPN account. Your password is the password you used when creating your ZoogVPN account.
Under ‘Secret‘ enter: ZoogVPN
Keep PROXY ‘Off’.
Once all information is correctly entered tap on ‘Done’ to save your IPSec VPN settings.
Step 5 – Turn on Zoog IPsec VPN
Turn VPN on by sliding the ‘On’ button right.
Upon successful connection, the following screen will be displayed. To turn off the VPN just slide the button left.

That’s it! It’s that simple! Now you know how to use VPN on iPhone and protect your internet connection, but don’t forget that iPad has a similar installation principle so you can use this instruction for both devices.
Start using ZoogVPN today to ensure a safe internet experience.
Don’t forget to connect with us on Facebook and Twitter. We strongly encourage Free Plan users to show their support on social media. Thank you.


