Before we start an active ZoogVPN subscription is required and your device must be connected to the Internet.
We highly recommend using our dedicated Windows app instead of a manual setup. It takes a few seconds to install and it is more secure as we have some additional features in our apps including DNS leak protection, IP leak protection, and more!
Сhoose the preffered VPN protocol:
Step 1 – Download OpenVPN App
Download official OpenVPN app.
Step 2 – Run OpenVPN Installation
Run the setup with administrator privileges and follow the installation steps. Confirm the Windows security messages if those will show up.

Step 3 – Installation Process
Download OpenVPN Configuration Files and unzip them. Copy all files to the OpenVPN configuration folder (by default C:/Program Files/OpenVPN/config/) and confirm all Windows security messages.

If you require a particular location only, you can select the server you need from the server list here. After that simply download a specific OpenVPN configuration file with UDP or TCP protocol.
NB: To store your login information permanently, you have to edit the file userpass.txt and enter your ZoogVPN login information there.
Step 4 – Run as Administrator
Click with right on the OpenVPN desktop icon, click on ‘Properties’ and go to the tab ‘Compatibility’. Check ‘Run the program as administrator’.

Step 5 – Run OpenVPN App
Start OpenVPN with administrator privileges and click right on the OpenVPN tray icon. After that hover on ‘System profiles’ and select your favorite location and click on ‘Connect’.

The last step is to enter account credentials. Your username is basically the email address of your ZoogVPN account. Your password is the password you used when creating your ZoogVPN account. Simply enter the same login information to the following fields:

NB: To ensure fast internet speed, it’s recommended to connect to the nearest VPN server.
Step 6 – Connection Successful
Once the connection has been successfully established, the OpenVPN icon turns green. You can manage your VPN connection with OpenVPN. The connection will change your public IP to the VPN server’s IP.
Step 7 – Surf the Web your way!
Hoorah! You are now connected to ZoogVPN via OpenVPN app.
Enjoy! You have now taken control of your Internet freedom, privacy, and security.
Don’t forget to connect with us on Facebook and Twitter. We strongly encourage Free Plan users to show their support on social media. Thank you.
Didn’t find an answer to your question? Contact our 24/7 customer support team here.
Step 1 – Network icon
Click on the ‘Network icon’ (tray icon) and then click on the ‘Network Settings’ link.

Step 2 – Click on ‘VPN’.

Step 3 – Click on ‘+ Add a VPN Connection’
Step 4 – Enter Connection Name
For ‘Connection Name’ enter ZoogVPN

Step 5 – Choose VPN Server
Next, choose a VPN server to enter the Server Address. You can find the list of available server addresses in your account here. For example, server address can look like this: nl.free.zoogvpn.com
To ensure fast internet speed, it’s recommended to connect to the nearest VPN server.
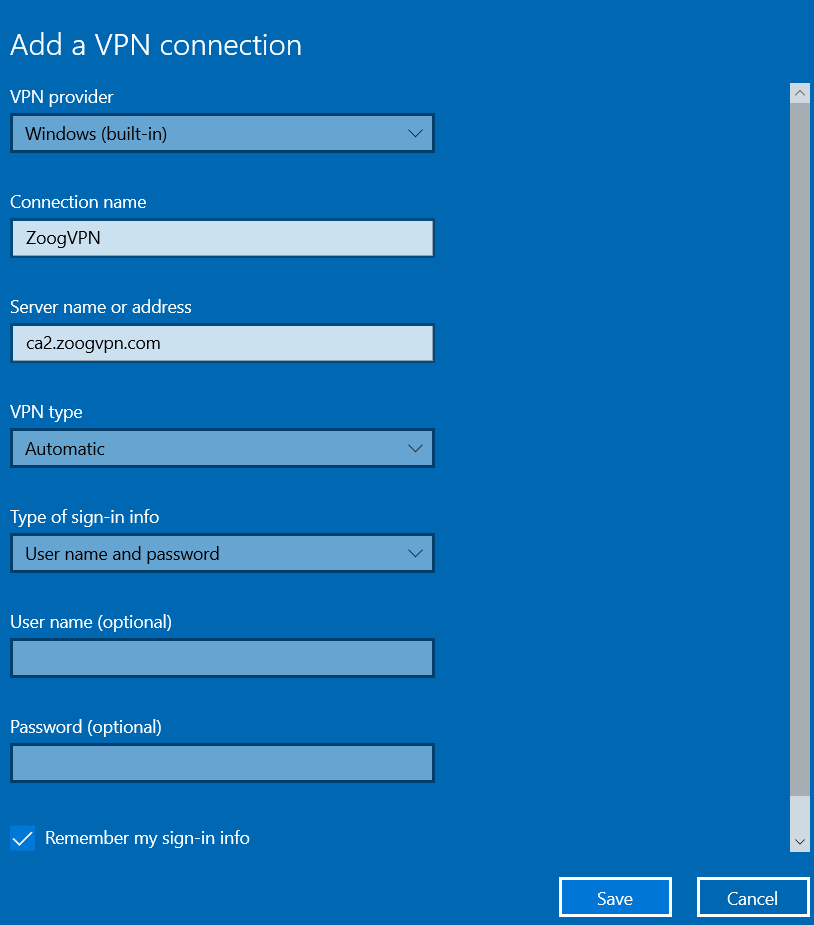
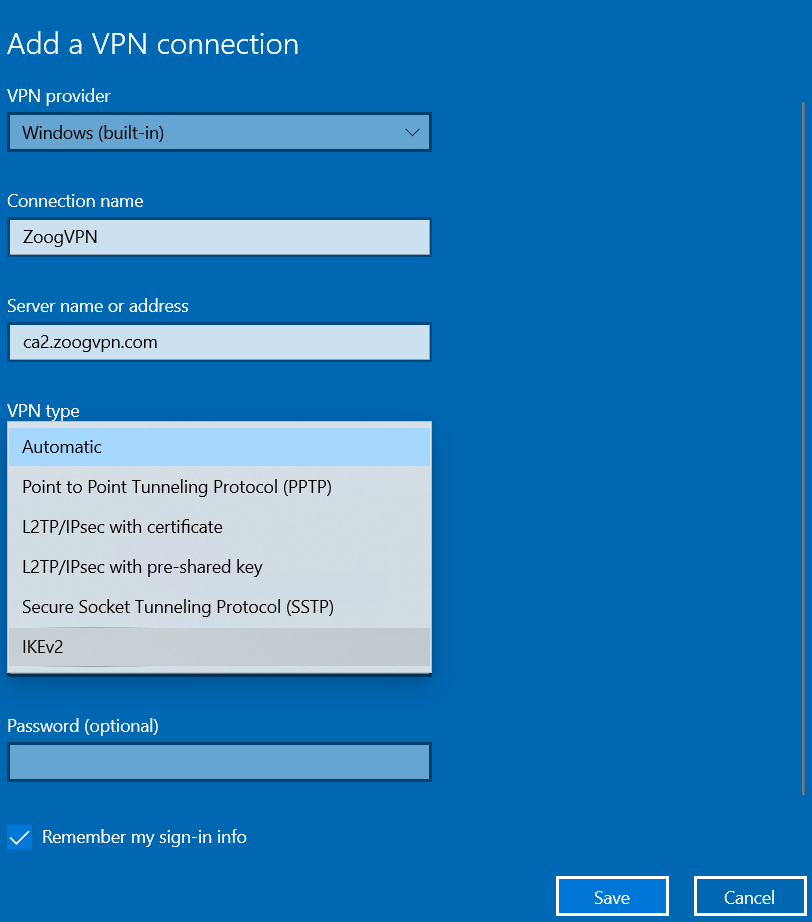
Step 6 – VPN Type
For ‘VPN Type’ choose IKev2.
Step 7 – Enter Login Details
Your username is basically the email address of your ZoogVPN account. Your password is the password you used when creating your ZoogVPN account. Simply enter the same login information to the following fields:

Step 8 – Save and Remember Details
Tick the’ Remember my sign-in info’ checkbox and click Save to continue.

Step 9 – Configure IKev2 Settings
1. In the Network & Internet screen, click ‘VPN’ on the left

2. Click ‘Change adapter options’ on the bottom right

3. Right-click on the ‘ZoogVPN’ connection and choose ‘Properties’

4. Under the ‘Networking’ tab, select ‘IPV4’ → ‘Properties’ → ‘Advanced’ and check ‘Use default gateway on remote network’.


5. Under the ‘Security’ tab, in the ‘Data encryption’ section choose ‘Require encryption (disconnect if server declines)’

6. In the ‘Authentication’ section choose ‘Microsoft: Secure password (EAP-MSCHAP v2) (encryption enabled)’
 6. Click OK twice to save
Step 10 – Connect to VPN
1. Click on the Start menu
2. Click on Settings

3. Click Network & Internet
4. Click on VPN

5. Click on ZoogVPN and click on ‘Connect’.

Hooray! You are now connected to Zoog VPN.
To disconnect simply click on the ‘Disconnect’ button and browse the internet without a VPN.
Enjoy! You have now taken control of your Internet freedom, privacy, and security.
Don’t forget to connect with us on Facebook and Twitter. We strongly encourage Free Plan users to show their support on social media. Thank you.
Didn’t find an answer to your question? Contact our 24/7 customer support team here.
Step 1 – Network icon
Click on the ‘Network icon’ (tray icon) and then click on the ‘Network Settings’ link.
Step 2 – Click on ‘VPN’.

Step 3 – Click on ‘+ Add a VPN Connection’
Step 4 – Enter Connection Name
For ‘Connection Name’ enter Zoog VPN

Step 5 – Choose VPN Server
Next, choose a VPN server to enter the Server Address. You can find the list of available server addresses in your account here. For example server address can look like this: nl.free.zoogvpn.com
To ensure fast internet speed, it’s recommended to connect to the nearest VPN server.

Step 6 – VPN Type
For ‘VPN Type’ choose L2TP/IPsec with a pre-shared key.

Step 7 – Input ‘ZoogVPN’ into the Pre-shared key field

Step 8 – Enter Login Details
Your username is basically the email address of your ZoogVPN account. Your password is the password you used when creating your ZoogVPN account. Simply enter the same login information to the following fields:
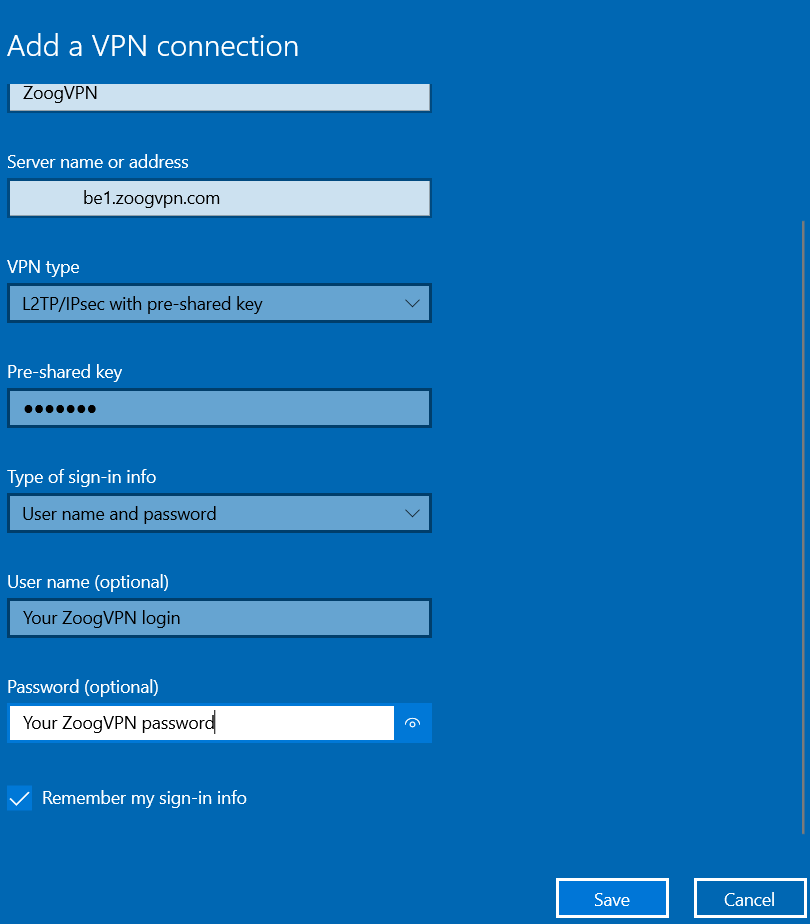
Step 9 – Save and Remember Details
Tick the’ Remember my sign-in info’ checkbox and click Save to continue.

Step 10 – Configure L2TP Settings
1. In the Network & Internet screen, click ‘VPN’ on the left.

2. Click the ‘Change adapter options’ link on the bottom right.

3. Right-click on the Zoog VPN connection and choose ‘Properties’

4. Under the Security tab, select ‘Allow These Protocols’

5. Click Advanced Settings
6. Enter ‘ZoogVPN’ as the preshared key

7. Click OK twice to save
Step 11 – Connect to VPN
1. Click on the Start menu
2. Click on Settings
3. Click Network & Internet
4. Click on VPN

5. Click on Zoog VPN and click on ‘Connect’.

Hooray! You are now connected to Zoog VPN.
To disconnect simply click on the ‘Disconnect’ button and browse the internet without a VPN.
Enjoy! You have now taken control of your Internet freedom, privacy, and security.
Don’t forget to connect with us on Facebook and Twitter. We strongly encourage Free Plan users to show their support on social media. Thank you.
Didn’t find an answer to your question? Contact our 24/7 customer support team here.
Step 1 – Network icon
Click on the ‘Network icon’ (tray icon) and then click on the ‘Network Settings’ link.
Step 2 – Click on ‘VPN’.

Step 3 – Click on ‘+ Add a VPN Connection’
Step 4 – Enter Connection Name
For ‘Connection Name’ enter Zoog VPN

Step 5 – Choose VPN Server
Next, choose a VPN server to enter the Server Address. You can find the list of available server addresses in your account here. For example, server address can look like this: nl.free.zoogvpn.com
To ensure fast internet speed, it’s recommended to connect to the nearest VPN server.

Step 6 – VPN Type
For ‘VPN Type’ enter Point to Point Tunneling Protocol (PPTP).

Step 7 – Enter Login Details
Your username is basically the email address of your ZoogVPN account. Your password is the password you used when creating your ZoogVPN account. Simply enter the same login information to the following fields:

Step 8 – Save and Remember Details
Tick the’ Remember my sign-in info’ checkbox and click Save to continue.
Step 9 – Connect to VPN
1. Click on the Start menu
2. Click Settings.
3. Click Network & Internet
4. Click on VPN

5. Click the Zoog VPN and click on ‘Connect’.

Hooray! You are now connected to Zoog VPN.
To disconnect simply click on the ‘Disconnect’ button and browse the internet without a VPN.
Enjoy! You have now taken control of your Internet freedom, privacy, and security.
Don’t forget to connect with us on Facebook and Twitter. We strongly encourage Free Plan users to show their support on social media. Thank you.


