Here is how to set up a VPN (OpenVPN) on your Tomato router.
Before we start an active ZoogVPN subscription is required and your device must be connected to the Internet.
Please note that we do not offer support with flashing routers.
Before you get started, make sure that:
– Check whether your router is compatible with Tomato. If so, you simply need to download and install it.
– Your Tomato router has been flashed with the newest Tomato Firmware.
– Your Tomato router has a local IP address of 192.168.1.1.
– Main home router has a different LAN subnet (e.g. 192.168.50.1).
Step 1 – Router Panel
On your web browser, go to your router’s control panel (on most tomato routers the default address is http://192.168.1.1). Log in with your default credentials, which are ‘admin’ for both username and password. The initial step is to select your router’s security type and password.
Step 2 – Change IP and Subnet
Changing your router’s default IP will prevent you from having conflicts with other subnets with the same IP address. To change your default IP, click Basic->Network and then change it to whatever you desire. You will need to set the IP Address Range according to the address you allocate, e.g., the range for an IP of 192.168.50.1 will be 192.168.50.100-192.168.50.149.
Step 3 – Router Settings
Firstly, download the configuration files by clicking on Download OpenVPN Configuration Files according to your VPN Plan.
After that, click VPN Tunnelling ->OpenVPN Client. Then enter VPN settings as follows:
Basic Setup
– Start with WAN – Checked
– Interface type – TUN
– Protocol – UDP
– Server Address – Choose a VPN server to enter the Server Address. You can find all available server addresses in your account here. For example, the server address can look like this: nl.free.zoogvpn.com
To use a UDP connection, open the VPN configuration file you downloaded, or download it again here. Open it with any program that can read files and check which port is specified inside this configuration:
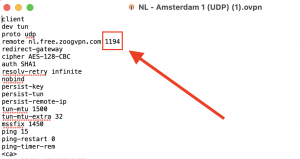
Enter the value from the desired OpenVPN configuration for the ‘Port’ field.
To use a TCP connection, open the respective OpenVPN configuration for TCP and enter the value of the TCP port from the OpenVPN configuration to the ‘Port’ field.
To ensure fast internet speed, it’s recommended to connect to the nearest VPN server.
– Firewall – Automatic, then check ‘Create NAT on Tunnel.’
– Authorization mode – TLS
– Username/Password Authentication – Checked
– Extra HMAC authorization – outgoing (1)
Advanced Setup
– Poll Interval – 0
– Redirect Internet Traffic – Unchecked
– Accept DNS Configuration – Relaxed
– Encryption Cypher– AES-128-CBC
– Compression – Disabled
– TLS Renegotiation – -1
– Connection Retry – 30
– Verify Server Certificate – Unchecked
– Connection Retry – 30
– Custom certification – Copy and paste the following text into the Custom Configuration field, then click Save:
– – – – – – – – – – – –
auth SHA1
– – – – – – – – – – – –
Step 4 – Copy Keys
After entering these fields in the Basic and Advanced tabs, click on the Keys tab. You will find four fields, namely Static Key, Certificate Authority, Client Certificate, and Client Key.
The text to be pasted in each of them can be found in the .ovpn configuration files downloaded earlier. For the Static Key field, copy the text between the <tls-auth> and </tls-auth> tags. For the Certificate Authority field, copy the text between <ca> and </ca> tags. Leave Client Certificate and Client Key fields blank also.
Step 5 – Connect to Zoog VPN
To connect, click on Start Now and wait for around a minute or two for the connection to get fully established.
Click on the ‘Status’ tab to check if you’re now connected.
Once the router has successfully connected to Zoog VPN, open any of your devices connected to the router and check that the flag on your account page has now turned to the desired country flag to verify a successful connection.
Enjoy! You have now taken control of your Internet freedom, privacy, and security.
Don’t forget to connect with us on Facebook and Twitter. We strongly encourage Free Plan users to show their support on social media. Thank you.
Still, have any questions? Get in touch with our customer support here.


