ZoogVPN is one of the best options for Internet security and privacy. Setting it up on your TP-Link router will give you the ability to protect all the devices connected to your local network with a single action. In this article, we will tell you how to configure ZoogVPN on TP-Link router in easy and simple steps.
The TP-Link router supports three types of virtual private networks (VPNs) – L2TP/IPsec, PPTP and OpenVPN. This means that you can use any of these protocols to connect to a virtual private network and protect your Internet connections while online. Each of these protocols has its own advantages and disadvantages, and you can choose the right one for you based on your security and usability requirements.
Below you can read their evaluation on all the important points.
L2TP/IPsec:
- Safety: 5 (high level of protection)
Speed: 3 (medium)
Stability: 4 (good)
PPTP:
- Security: 2 (quite low compared to other protocols)
Speed: 5 (very fast)
Stability: 4 (good)
OpenVPN:
- Safety: 4 (high level of protection)
Speed: 4 (good)
Stability: 5 (very stable)
Please note that these are only general estimates and results may vary from case to case depending on various factors such as internet connection quality and network settings.
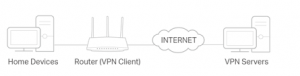
How to set up VPN on TP-Link router (OpenVPN)

Log in to the router’s web interface, configure the VPN connection, and select the devices for which you want to create a VPN connection. :
1. Type http://tplinkwifi.net in the browser address bar and log in using your TP-Link ID or the router password you created.
2. Click the Advanced tab and select the VPN Client menu.
3. Check the Enable checkbox next to VPN Client, then click Save.
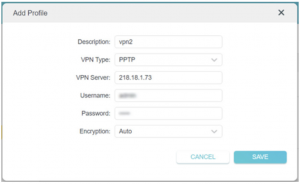
А. In the Server List section, click Add.
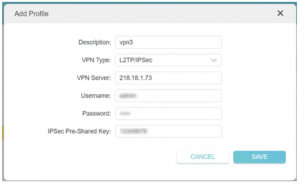
B. Enter a name in the Description field and select the VPN connection type from the VPN Type drop-down list.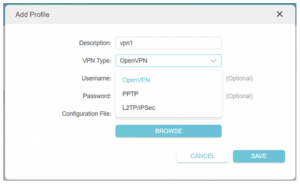
C. Enter the VPN connection details.
OpenVPN: Enter the VPN user name and password.
- Under ‘Username’ and ‘Password’, enter your account credentials. Your username is the email address of your ZoogVPN account. The password is the password you used when you created your ZoogVPN account.
- Next, choose a VPN server and download the configuration of the location you want.
- A full list of available servers for your subscription plan and the configurations you can download can be found by clicking here.
- After downloading the files, go back to your router’s control panel and click “Browse” in the “Add Profile” window.
- Navigate to the OpenVPN configuration file you just downloaded and click “Open”.

- Click “Save” to confirm the configured settings.
- In the “Server List”, enable the ZoogVPN connection you just created.
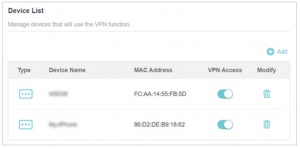
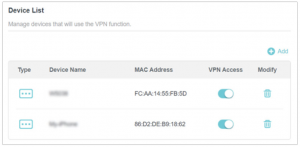
- In the “Device List” section, click on the “Add” button.
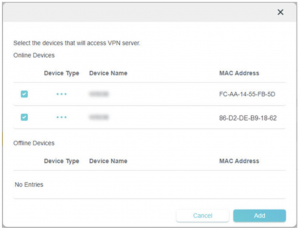
- Enable “VPN access” for the added devices and save the settings.
By following these steps, you should have successfully set up a VPN connection to the ZoogVPN server on your TP-Link router.
How to set up VPN on TP-Link router (PPTP)

PPTP: Enter the address of the VPN server (for example, the IP address as shown in the screenshot or the domain name – nl.free.zoogvpn.com).
- Under ‘Username’ and ‘Password’, enter your account credentials. Your username is the email address of your ZoogVPN account. Password is the password you used when you created your ZoogVPN account.
- Then select the VPN server and download the configuration for the location you need.
- A full list of available servers for your subscription plan and configurations you can download can be found by clicking here.
- Save your settings.
- In the list of servers, enable the server you want.
- Add the devices on which the VPN will be used.
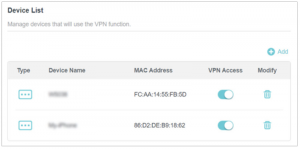
- In the Device List section, click Add.

- Select and add devices that will have access to the VPN server you configured and save the settings.
- Done! The specified devices will now have access to the VPN server you activated.
How to set up VPN on TP-Link router (L2TP/IPsec VPN)
L2TP/IPsec VPN: Enter the address of the VPN server (e.g. nl.free.zoogvpn.com).
- Under ‘Username’ and ‘Password’, enter your account credentials. Your username is the email address of your ZoogVPN account. Password is the password you used when you created your ZoogVPN account.
- Next, choose a VPN server and download the configuration of the location you want.
- A full list of available servers for your subscription plan and configurations you can download can be found by clicking here.
- Fill in the IPSec Pre-Shared Key field. Enter ZoogVPN (exactly with a capital Z and no spaces).
- Save the settings.
- In the list of servers, enable the desired server.
- Add the devices on which you want to use the VPN.
- In the Device List section, click Add.
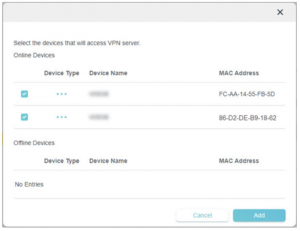
- Select and add devices that will have access to the VPN server you configured and save the settings.
Done! The specified devices will now have access to the VPN server you activated.
As a result, in the list of servers, you can include the one you want.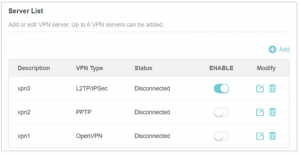
P.S. If your TP-Link router does not accept e-mail as username when configuring VPN on the router, it may be due to outdated firmware. In one of our cases the problem was solved after updating the firmware to the latest version – after that e-mail was successfully accepted as username.
Is this solution for TP-Link from ZoogVPN free of charge?
ZoogVPN offers a choice of 5 servers around the world 100% free of charge. You can connect to a server in the US, UK, Germany, Netherlands and Singapore to bypass geo-restrictions and keep your data private.
Bottom line
In 2023, online privacy and security is more important than ever before. With the growing amount of information we share online, it’s becoming increasingly important to protect your data from unauthorized access. This includes personal financial data, personal information and company data.
TP-Link router provides a way to protect one’s information by supporting several VPN protocols such as L2TP/IPsec, PPTP and OpenVPN. It allows users to use the internet safely and privately, protecting their data from hackers and other unscrupulous individuals.
If you have any further questions about installing VPN on TP-Link router, feel free to contact our support team via email or chat.
- Diana BestaievaContent Writer at ZoogVPN. Diana deeply explores the newest technologies and shares valuable insights engagingly and comprehensively. Keeping up with the tech news, she makes in-depth content, explaining complex concepts with ease.


